I had been meaning to talk about GraphQL for a while. The idea is to show, in the realest way possible, the use of this technology.
While I was creating the sample project, I ended up including some really cool stuff, which fits very well in real projects, so expect to find good examples with the following technologies:
- Bogus;
- HotChocolate;
- Entity Framework Core;
- Dependency Injection;
- Pagination with GraphQL;
- Queries;
- Mutations.
(the source code will be available on GitHub. The link is at the end of this article)
A bit of GraphQL history
First of all, what is GraphQL?
“GraphQL is a query language for APIs and a runtime for fulfilling those queries with your existing data. GraphQL provides a complete and understandable description of the data in your API, gives clients the power to ask for exactly what they need and nothing more, makes it easier to evolve APIs over time, and enables powerful developer tools.”
This is the formal definition of GraphQL, which is on the official website, but let's go back in time a bit. It was in 2012 that GraphQL emerged, from an internal Facebook project, but it was actually publicly released in 2015.
In 2018 it was finally transferred to the GraphQL Foundation, a Linux non-profit organisation. Its creator, Lee Byron, claims that the product has followed its object from the beginning and that it’s an omnipresent being on all web platforms.
The project happened, in fact, because Apple focused all its resources on native mobile apps, while Google didn't care much about the user experience in the web/mobile app. That same year, Facebook built its app, betting heavily on HTML5 (big mistake, according to Mark Zuckerberg), but the transition from web to mobile market was not mature enough. So Facebook hired a lot of senior iOS engineers and with that they decided to rewrite the whole app for iOS, starting with the news feed.
As standard, they used a RESTful API and that brought several problems:
-
Network slowness: the API couldn't return all the data, so the client was forced to make more and more requests to different APIs;
-
Documentation problems: due to the complexity and amount of implementations, the documentation was sometimes outdated;
-
Application maintenance: about the API responses, if the API changed its response format, the client's code had to change accordingly. Engineers had to manually maintain client model classes, network logic and other things to ensure the right data was loaded at the right time before rendering the display.
Advantages and disadvantages?
But what really is GraphQL? What are its advantages and disadvantages?
The answer is simple: GraphQL is a query language used to fetch only the data that the customer wants from the database.
Advantages:
-
Network speed: unlike the RESTful approach, GraphQL brings only what the client needs. This decreases the amount of calls and the size of requests;
-
Robust static types: lets clients know what data is available and what type of data it is;
-
Enabling client evolution: the format of the response is controlled entirely by the client's query. Therefore, server-side code becomes much simpler and easier to maintain. When you remove old fields from an API, those fields will be preempted, but they will still continue to work. This gradual process of backwards compatibility removes the need for versioning. After all these years, Facebook is still on version 1 of its GraphQL API;
-
Documentation: documentation is automatically generated and always up to date;
-
Arbitrary query code: GraphQL is adaptive. It's not about databases. It can be adopted on top of an existing RESTful API and can work with existing API management tools.
Disadvantages:
-
Learning curve: if you already know REST, you may possibly have some difficulties in its implementation;
-
Caching: it is more difficult with GraphQL;
-
Queries: they always return code 200.
Enough chit-chat! Let’s get to work!
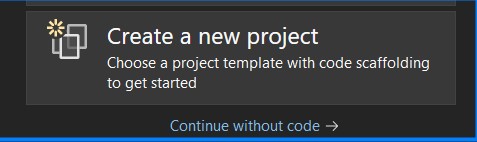
- Let’s create na API project:
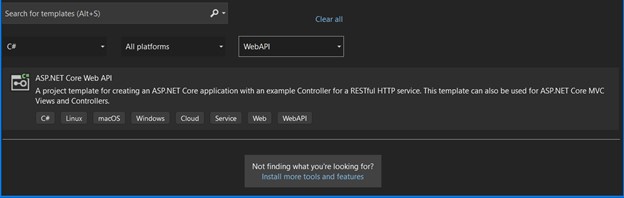
- Select the project type "ASP.NET Core Web API":
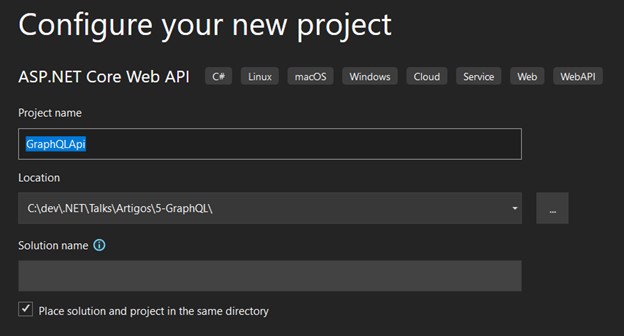
- Enter a name for your solution:
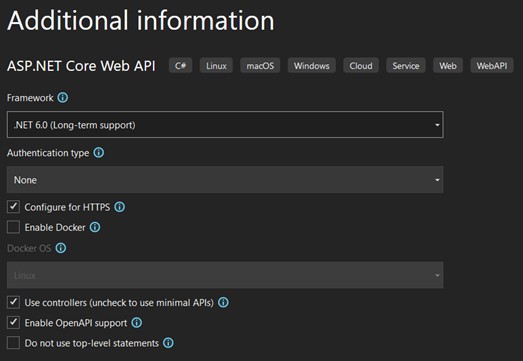
- Select the version ".NET 6.0 LTS", keep the other options as shown in the image and click on "Create":
- The structure of the solution should look like this:
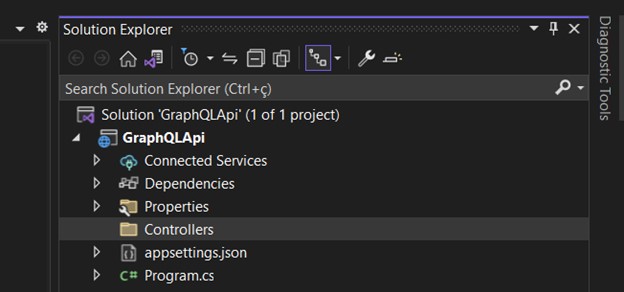
- Create the following folders:

- "Data" is where we will create the classes that will populate our SQL Server database (seeds). This folder should also have the context class;
- "GraphQL" is where the "Queries" and "Mutations" files are, which we will cover later;
- “Interfaces", as the name suggests, is where we will create an interface to handle our services;
- "Migrations" is created automatically when we run the migration;
- "Models" is where we should create our concrete models classes;
- "Services" should contain the concrete service class, which should implement the interface previously created;
- "ViewModels" is just a transport class. - Now let's install the packages needed for this project:
- Install-Package Bogus
- Install-Package HotChocolate.AspNetCore
- Install-Package HotChocolate.Data.EntityFramework
- Install-Package Microsoft.EntityFrameworkCore
- Install-Package Microsoft.EntityFrameworkCore.SqlServer
- Install-Package Microsoft.EntityFrameworkCore.Tools
- Install-Package Microsoft.EntityFrameworkCore.Abstractions
- Install-Package Microsoft.EntityFrameworkCore.Design
- Install-Package Microsoft.EntityFrameworkCore.Relational - Let’s now create the classes "Customer" and "Invoice" in the "Models" folder.
First let's create the two classes that will represent our model. The goal is to have a class called "Customer" and another called "Invoice". The latter is a list of invoices per customer (we will simulate several customers), which have a random sequence of invoices. This will be created automatically using some great features (we'll get to that).
Customer Class
First create an interface in the "Interfaces" folder called "IAggregateRoot":

We have two constructors in the "Customer" class - the first is used purely for Entity Framework.
We can also see that the class references "Invoice", which we will create in the next step. Only with "Customer" will an error be shown, until the "Invoice" class is created.
I used some important techniques:
- See that the "Customer" class implements an interface called "IAggregateRoot", where its only function is to be a markup interface. It's a good practice and very applied in projects that use DDD design. It’s used to show that "Customer" is an aggregation root. This technique guarantees cohesion, expressiveness and domain integrity, since the access to these entities can only be done from the root entity, which in our case is "Customer". It’s important to take into consideration that this is just a demonstration – practically speaking, this technique applies to larger projects that have more contexts;
- Another important feature is the configuration of the class properties, decorating them with validations. By using of Data Annotations, we can create validations directly in the class, which will help us define which fields are required, ranges, field sizes, date comparisons, regex and much more;
- All our "set's" are private, hidden from the external world, giving the responsibility to the class itself for the creation of a new instance. This way, we guarantee the condition of our class and it will only be possible to change it through the methods provided by it.
I took the opportunity to indicate the primary key and the relationship that we will have – 1: N – with the "Invoice" class. I particularly do not create this way. In larger projects it makes sense to create the mapping classes properly separated - besides, the concrete class gets a cleaner and easier to understand code.
Invoice Class
Very similar to the "Customer" class in terms of structure. Lines 35, 36 and 37 reference the "Customer" class for the purpose of creating the tables and their relationships used in the Entity Framework.

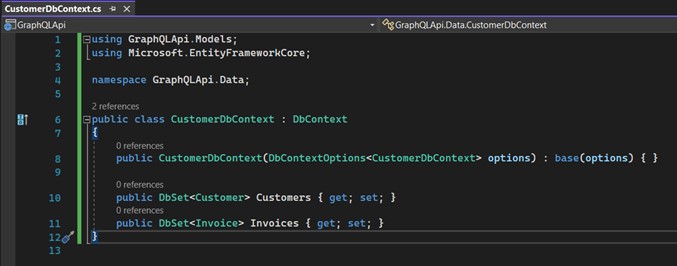
- Create the class "CustomerDbContext" inside the "Data" folder. It will inherit from "DbContext", which is part of the Entity Framework. Basically, it represents a type of session with the database and, this way, it allows us to make queries, save instances, etc. ....
- Let's create automatic data with Bogus. A resource I use a lot in projects is the "Bogus" package. It helps us create dummy data in a very smart and efficient way, and has a lot of methods that cater for all kinds of data generation, such as financial data, dates, human data like date of birth, gender, names, mathematical data, and so on...
Create a folder inside the "Data" folder and call it "Seeders". Inside this folder, create a class called "DbInitializer".
See that the "Seed" method will create an instance of "Customer". On line 23 we inform how many records we want to create and it will randomly create a number of "Customers". "Invoices" work the same way, with one important detail: on line 35, the "PickRandom" method will get an already created "Customer" to relate the "Invoices".
This is a great tool to use in unit tests.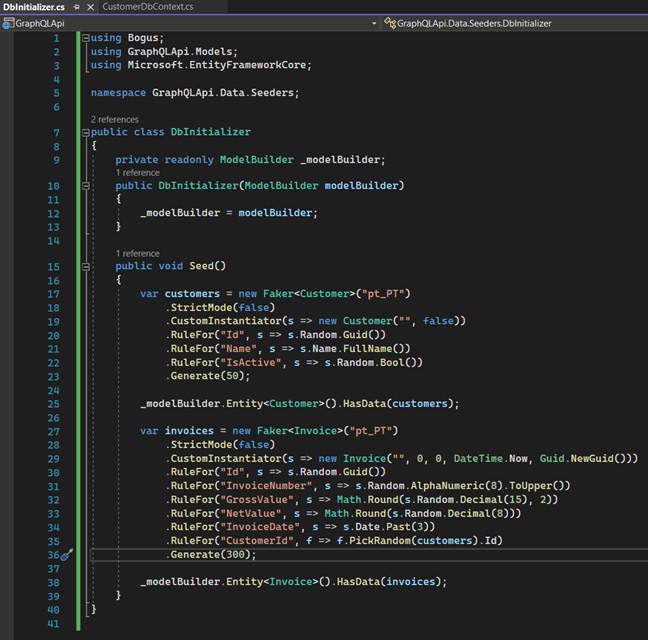
Now we go back to the "CustomerDbContext" class and include the call to the "DbInitializer" class, in the overload of the "OnModelCreating" method, which is executed every time we perform the update-database of a migration.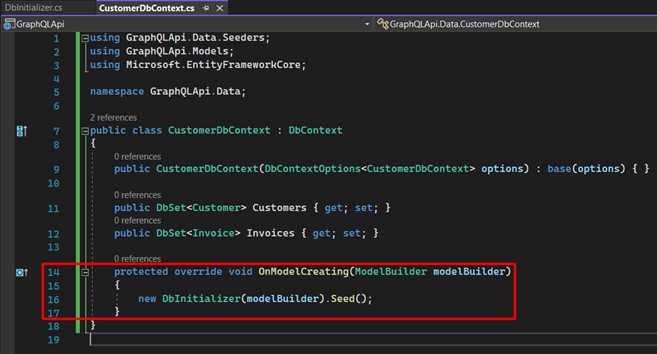
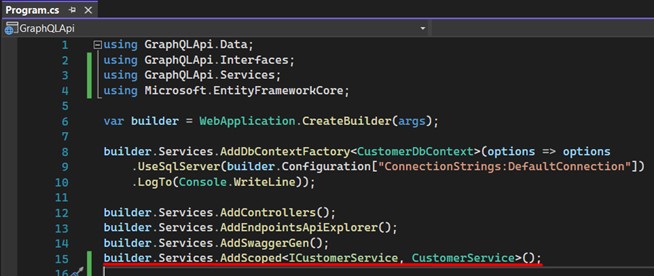
- Register the features in the API. Open the "Program.cs" class and include these lines. Here we are configuring our DbContext in the application. Later we'll change this class again:
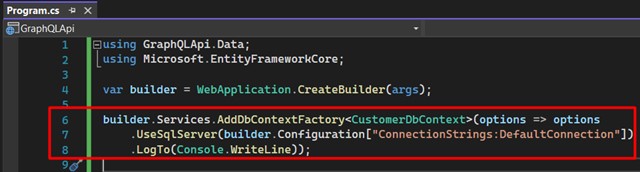
Understand that line 7 refers to the connection string, which will be used for data persistence, so open the file "appsettings.json" and register your own.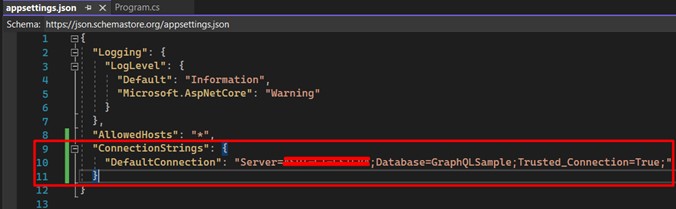
- Add the migration: create the database + tables. If everything went well until now, this is the right moment to run two commands: the first one will create the migration based on the "Models" and the following will actually run the SQL commands for our database.
In the Package Manage Console run the first command:
1 - Main command;
2 - The name that identifies the migration (I used "initial");
3 - Parameter that identifies the context;
4 - Context name;
5 - It means "Verbose", not mandatory (I always use it, because the whole process will be more detailed in the output).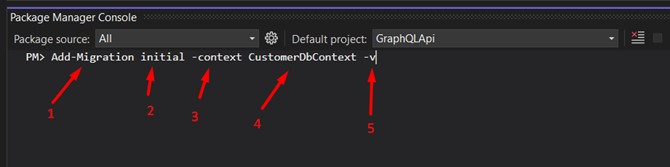
If all went well, you should see a file similar to this one. It is automatically generated with each migration and contains all the commands needed to create/modify our database and its tables, indexes, etc. ....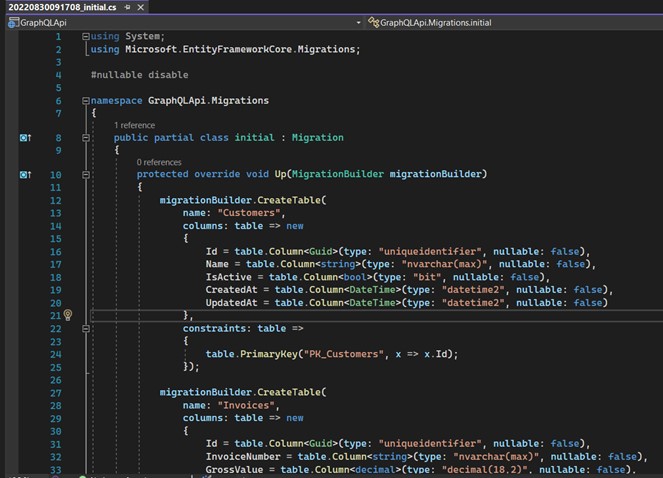
The second command is what will actually execute the commands on the database.
1 - Main Command;
2 - Parameter that identifies the context;
3 - Context name;
4 - It means "Verbose", not mandatory (I always use it, because the whole process will be more detailed in the output).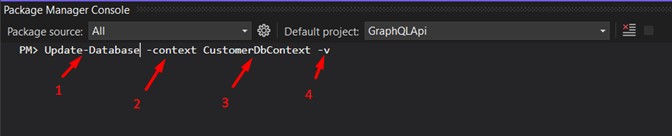
This last one is very important, because it’s when the "DbInitializer" class will be called to create our "fake" data. All this automatically. Open your SQL Server manager and see if everything was created correctly.
We can see that 3 tables were created: the first table in the image is the Entity Framework control table; the second is the "Customers" table; and the third is the "Invoices" table.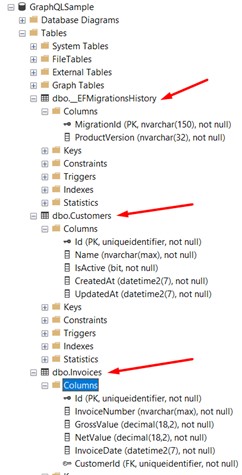
The data has already been created as shown in the image: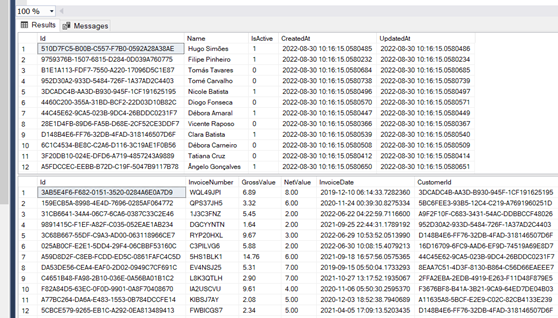
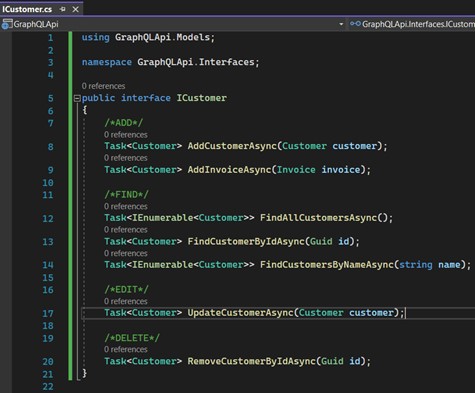
- Moving on to service creation. We will now create an interface "ICustomerService", which should contain the methods for persisting our data:
We'll create the service that will implement this interface. First part: we implement the methods for including "Customer" and "Invoice":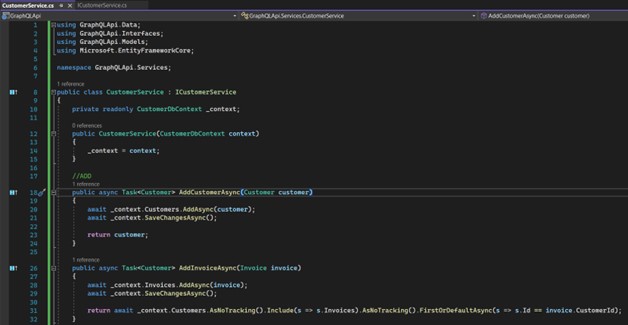
Then the methods for getting, editing and deleting data: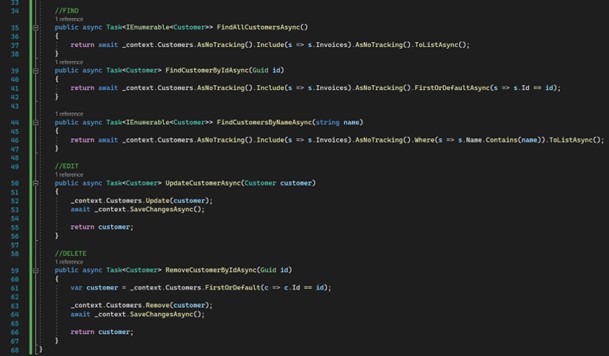
- Register the services in "Program.cs":
- Now let’s finally talk about GraphQL. There are two primary operations in GraphQL:
- Query: Used for data queries
- Mutation: Used for changing data.
Query
Practically speaking, Query works in a fluid way. You inform the fields that you intend to use, but without the need to have a view model in the server for each service that you intend to consume and return values.
E.g.: On the left, we see a type of query where, even though the service may return 10 fields, I only enter the ones I really need. On the right, the list of "pets" containing only the fields that I requested.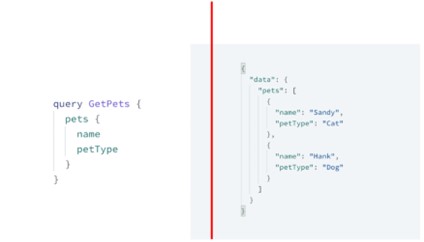
This other example shows how we can search for data by code: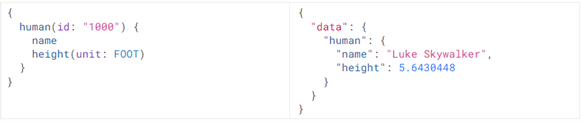
Mutations
Mutations, as the name suggests, are responsible for changing data. Whenever we want to edit, include or delete data, we should use this type.
E.g.: We inform that we want to use a mutation, then just add the method previously configured, and the values input. That would be enough to make the inclusion of this data.
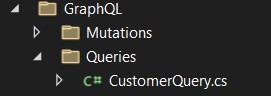
- Let’s create our queries: create a folder called "Queries" inside the "GraphQL" folder. Then create a class called "CustomerQuery", which should look like this:
First let's make the service dependency injection that returns the data. Then create 3 methods: the first will return all the "Customers"; the second one should get a "Customer" by Id; and with third one let's return "Customers" by informing a name.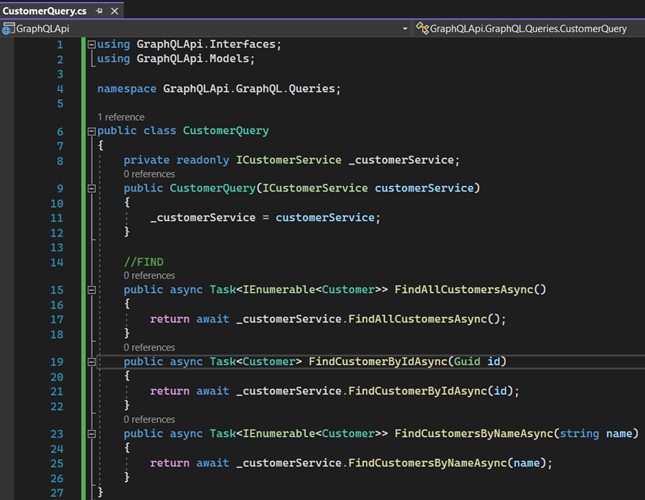
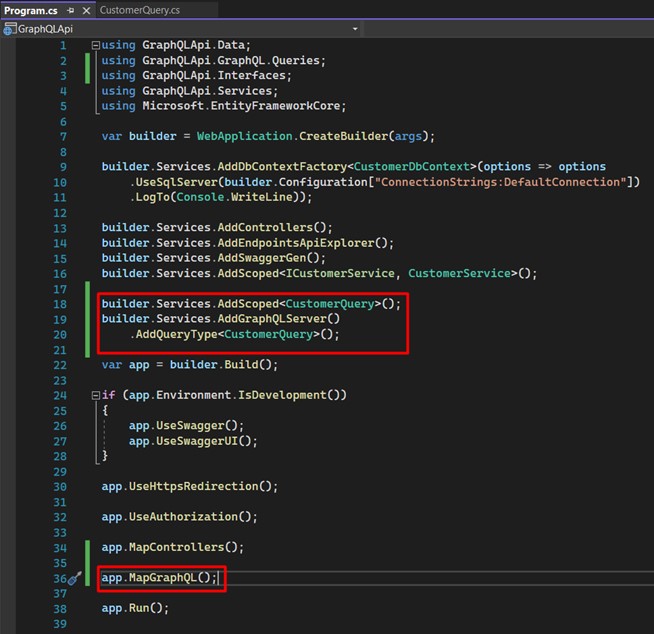
- Now we need to register GraphQL in "Program.cs":
- Change the configuration of the project, in the properties, by right-clicking on the project, last option "Properties", and search for "env".
This way, the opening happen be from the page: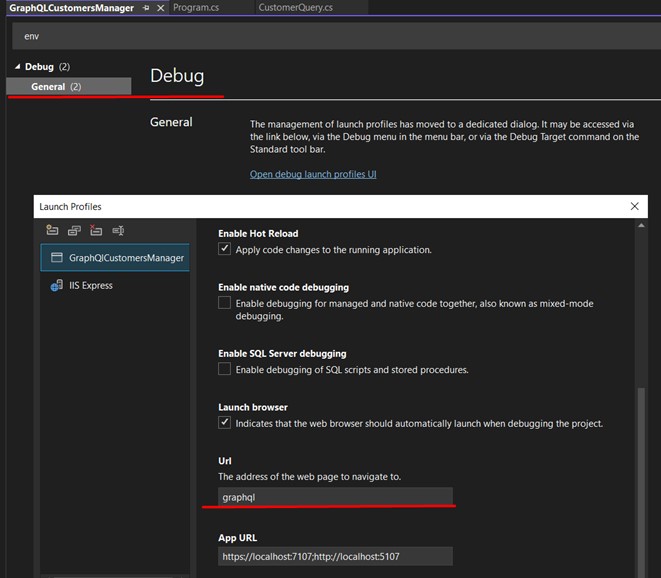
And run your application. You should get a response like this: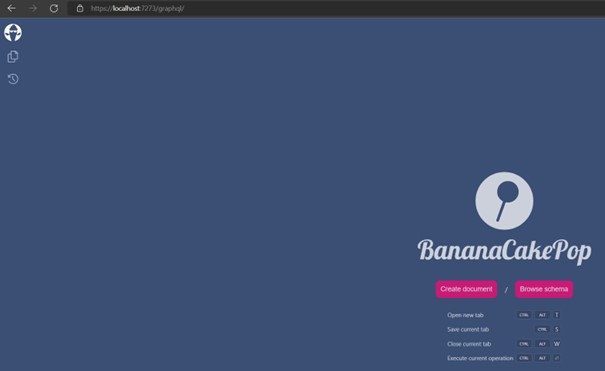
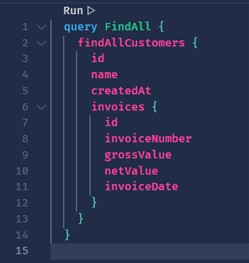
- Let's go to our first query. Click on "Create Document" and write the following Query...
And voilà! We have our first successful Query!
Some important details:
- We can see that I inform "query" and right after I can give a name to this query. In my case "FindAll", I say that I want only "id", "name" and "createdAt". The same thing applies to "Invoices".
- On the right side we can already see the result, the list of "Customers" and their corresponding "Invoices".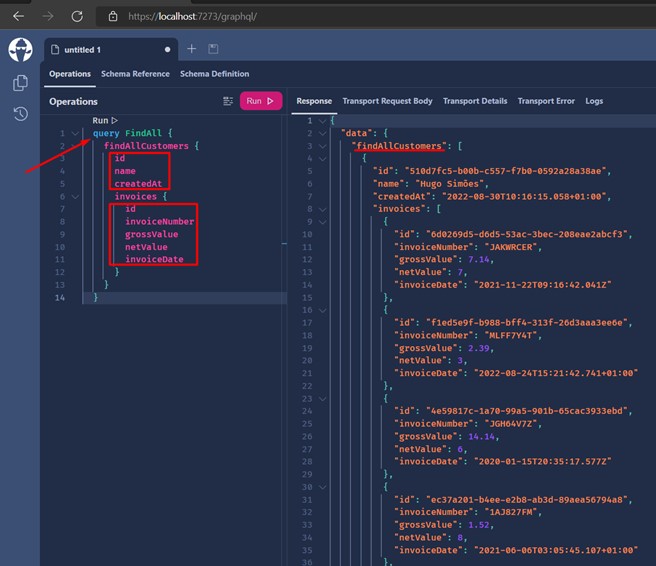
- Now we can search by "Name".
Example: by searching only "Customers" that contain the name "Carlos", the first image is the search and right below we can see the method that was used on the server. See that now I'm bringing only 3 fields of customer: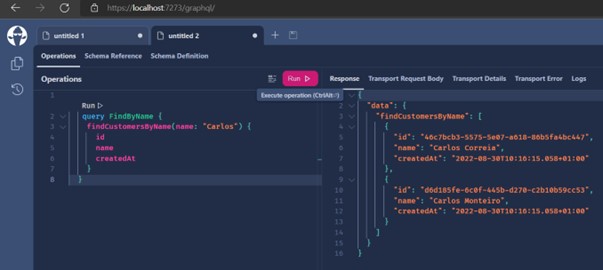

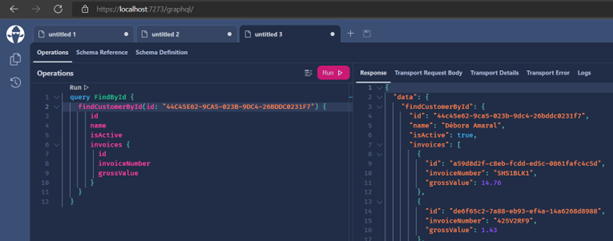
- Let's now search by Id. Get a random Id in the "Customer" table. See that I brought only data referring to the "Customer" with the Id = "44C45E62-9CA5-023B-9DC4-26BDDC0231F7":
- Now a valuable tip: let's implement a pagination to visualize our "Customers". Create a method like this:
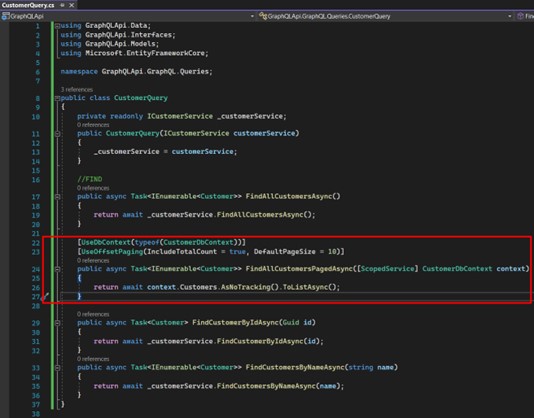
We decorate our method first with the attribute that helps us access the context for GraphQL. Right after that, another attribute that configures the use of pagination.
There are 2 types of pagination:
1) UsePaging: middleware returns a cursor that must be used later for each call. This way it moves on to the next pages;
2) UseOffsetPaging: more traditional model, where metadata containing page number, page size, and others that we will see, are informed and returned.
Run the application and make a new query, like this: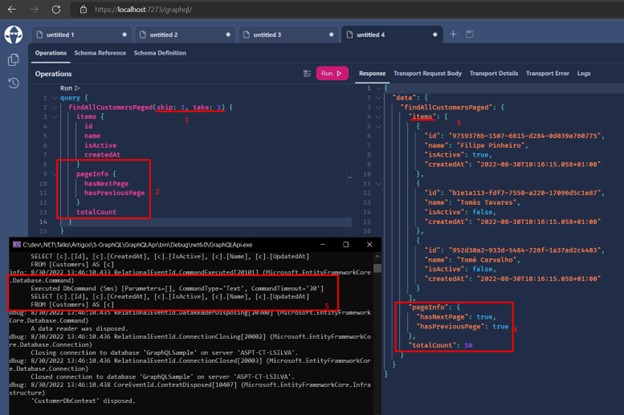
Observe the sequence:
1 - Inform the parameters "skip" and "take" which, respectively, represent the page and the number of items per page;
2 - "PageInfo" is provided by GraphQL;
3 - "Items" is the list of items returned based on the informed parameters;
4 - The return with "PageInfo" filled in;
5 - In the console we can see the query that was executed in SQL Server. Does it return what we need? Yes. Is it correct? No.
We still have a problem: imagine a table with 50.000 items. Even if we implement the pagination, it is only applied after the query has already been made to the database. So, the way it's implemented, for each request will be obtained and paginated, every time, 50.000 records. This will certainly bring a big headache with respect to performance. This occurs because we use an "IEnumerable" as a form of search, meaning that first the query is made in the database, and then filtered in memory. - Solving the pagination problem: change the method to look like this:
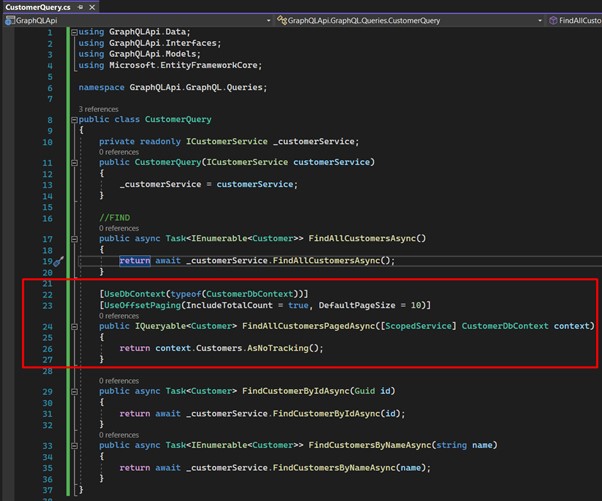
See that it returns an "IQueryable", which queries the database by using filters/pagination parameters, bringing in fact only the data we need.
The result is the same, only we can see that the SQL Server command already receives the parameters directly in the query.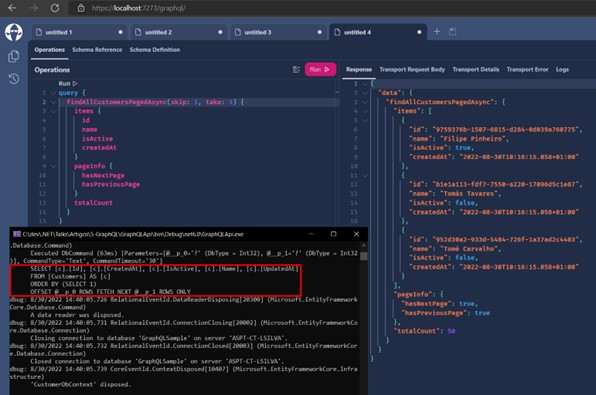
- Let's create our mutations. Remember that the "mutations" are used when we need to change the state of our entities, either for editing/inclusion/removal.
The first thing is to create a folder called "Mutations" inside the "GraphQL" folder. Inside the new folder we create the "CustomerMutations.cs" class.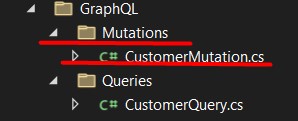
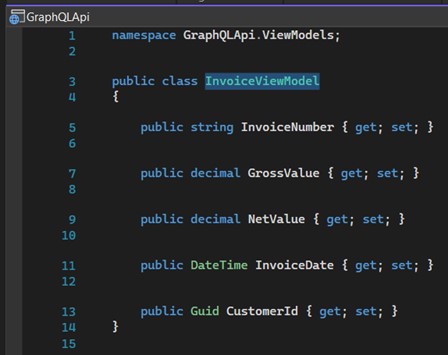
Inside the folder "ViewModels" we must create two View Models: "CustomerViewModel" and "InvoiceViewModel", used to receive the parameters of the requests.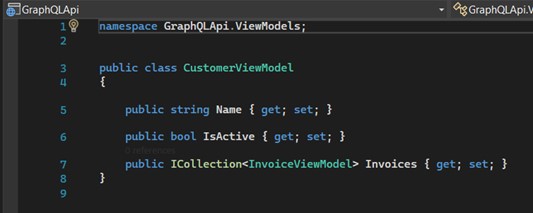
The "CustomerMutation" class, just like the Query, will contain the code responsible for consuming the "CustomerService" service.
So, we can see that we now have the methods "AddCustomerAsync", "UpdateCustomerAsync" and "DeleteCustomerAsync".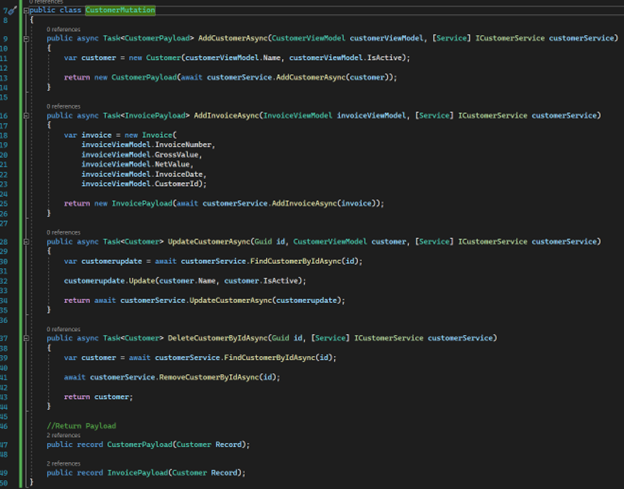
- Let's register the mutation. Again in "Program.cs" we are going to include the following code. Change your AddGrapQLServer to contain your mutation:

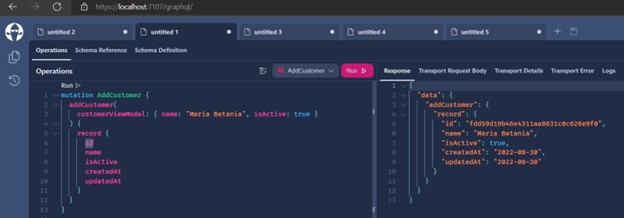
- Adding a record:
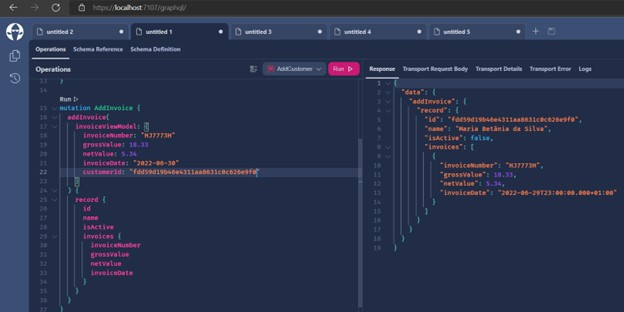
- Including an Invoice:
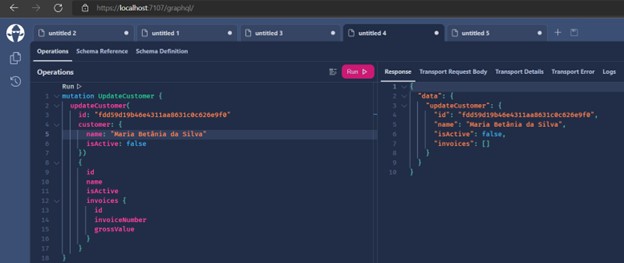
- Changing a record:
- Removing a record:

Conclusion
GraphQL is a great option for API creation. The performance is great, and we have less files in the project, since we don't need to create multiple endpoints. It allows the client (Mobile, Web, Angular, React) to have more freedom regarding the use and treatment of queries, and not be so dependent on the server side.
Understanding the type of project and if your team is prepared to perform with GraphQL as it does with REST is also an important factor.
Useful links:
- Github: Github Leosul GraphQL
- LinkedIn: LinkedIn GraphQL Article
- Medium: Medium GraphQL Article
Sources: